FoggyLog

Tue Dec 23rd 2003 23:48:28: Microchip PICs: ICSP with PicStart Plus

Productive Final Year Project work day today. Built up the first of the development circuits I need, and got it all working.

The bit I am most pleased about is the In Circuit Serial Programming facility that I've sussed out. It is possible to program the PIC16F877 without taking it out of the circuit, and without even disconnecting the power - just hit program in MPLAB, and wait a bit.

As I couldn't find a nice simple idiots guide to ICSP, I've decided to write one, so here goes.... (well, here's how I did it - this may not be correct, however it works for me):

  • You need 4 wires running from the PicStart+ Programmer to the circuit board:
    • Ground (pin 31 on the PicStart+) going to the gound of the entire circuit.
    • Data I/O - RB7 - pin 40 on the PicStart+ going to Pin 40 of the PIC in the circuit
    • Clock - RB6 - pin 39 on the PicStart+ going to Pin 39 of the PIC in the circuit
    • MCLR - Pin 1 on the PicStart+ going to Pin 1 of the PIC in the circuit

    According to the instructions I found on the web, you need 5V as well, however I found that if the circuit board has it's own 5V supply, then you don't need the 5V from the programmer.

  • If you are using RB6 and RB7 in your circuit, then you need to isolate them from the stuff external to the PIC. I'm not, so I can't comment on this.
  • You need to put a Schottky diode (I'm using a 1N4148) between Pin 1 and the circuit's 5V supply (arrow pointing towards Pin 1). This is to isolate the rest of the circuit from the 14V ish volts used for progamming.
  • You can disable Low Voltage Programming in MPLAB. This is not required, as I'm using High Voltage programming which saves me having to reserve RB3 for programming as well.

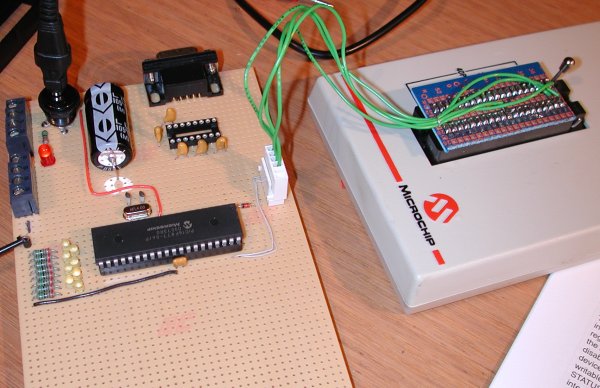
Think that's about it. If I think of anything else, I'll add it. Here is a photo of my setup:

UPDATE:

Well what is described above works most of the time... however... if you try and use PortB or if you put the processor to sleep, then you can't program the chip. To get round this I've now installed a switch to select where the PIC get's power from. It can either be from the board power supply (what I've called run mode), or it can be from the Pic Start (pin 32 on the PicStart+). Most of the time I leave the switch in "run" mode, however if I have a problem, I switch it into "prog" mode.

I assume the PicStart+ must turn power onto the chip with some specific timings which is why programming would sometimes fail, depending on what the software in it before was doing.


I have built the icsp cable conected directly of my picstart and the programming process doesn't start, what i can do?

Comment by beto at 23:09 on Thu 29 September 2005

Long cables can stop things working properly when programming PIC's. Therefore make sure you keep your wires as short as you can.

Comment by Gary at 21:04 on Fri 30 September 2005

We used this method for programming PICs in my previous job. We later developed our own programmer after we understood the PIC programming algorithm. I went on to make a programmer that uses the PC parallel port. You just need a programming language that lets you access the parallel port directly. I would still be using this method but Microchip have changed the programming algorithm from the 16F87x to the 16F87xA version. I need to buy a PicStart to verify I am writing to the device correctly. Hope the project went OK.

Comment by Moz at 10:52 on Sun 12 February 2006

Is it a similar set-up for programming the 16F628 with the picstart plus?

Tom

Comment by Tom at 13:30 on Mon 11 December 2006

Assuming the 16F628 can do In Circuit Serial Programming, then yes.

Comment by Gary at 13:36 on Mon 11 December 2006

but remember that you have to use the same pins as the 628 - not the 877 pins !

Comment by mc at 7:01 on Sat 9 June 2007

Very, very helpful! Thanks for posting this. Worked for the 16F88 like a charm! I just used a 10k resistor between the programming voltage and 5V on MCLR and that worked fine.

Comment by Brent at 1:16 on Sat 2 February 2008

Add New Comment

Name:
Email:
(Never displayed publically)
Comment:
HTML Tags allowed - <b>bold</b>, <i>italic</i> and <a href="http://...">Links</a>
Type "NoSpam" in Here:


<< Back